
These Nugget purses are so easy and fun I know when I made my 1st one I was jumping all around cause they are sooo cute .. I have not done a tutorial in a while so its way over due , Dont you think so too? I tried to put all the photos with each step of directions so hopefully they will be easy schmezy ( got my new word from Lori ) to follow .
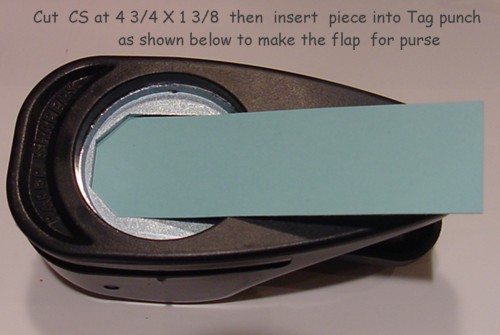
 so lets get started Cs is cut at 1 3/8 X 4 3/4( I believe the 3/8th line is be just a tad bit under the mark right before the 1/2 line ) you will know because the piece will NOT fit in the tag punch if its to big ,
You will only tag punch one end .
Ok next score your piece starting with the tag punch end at 3/4", 1",2 1/4 and 3 1/4" I always use my bone folder and my cutter when I score seems to work best for me
 This is what your piece should look like when finished scoring ( wish my photo was better .. But you can see the measurements this is where your score lines should be.. This is also the time to cut your piece at 4 1/2" .. Cutting the 1/4" off on the flat end
and also this is when you will stamp your piece ,, You can stamp both sides But I did not it is totally up to you .
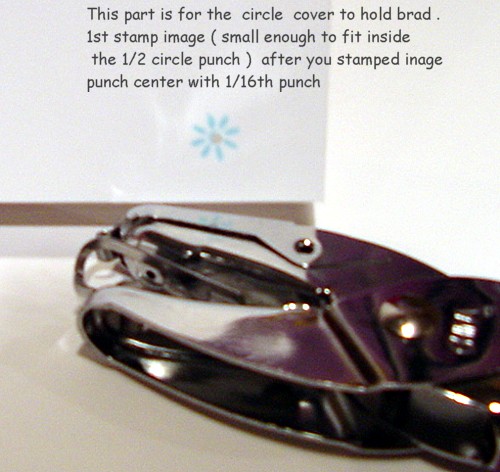
 Ok next using your image stamp on a pieces of coordinating cs ( I am using white) . You will want to use an image that will be small enough to fit inside the 1/2 circle punch stamp your image and then using your 1/16th punch, Punch a hole in the center of your image This will be for your Brad later.
 ok next line up your image and your tiny hole with the 1/2 circle punch. The easiest way is to line your punch up is looking at the punch upside down

Ok next is you will apply your adhesive I am using glue dots .. just apply one on each side between the 3/4 and 1" score line and apply your ribbon to the glue dots . This will be your purse handle . ( Dawns Side note ) I have also used snail adhesive for my nugget purses and they seem to be fine. Ok next  pre assemble your purse and using your handheld 1/16th circle punch again punch your tiny hole through the top purse flap and
the under neath piece. This is what it should look like when finished punching your hole now insert your brad into your 1/2 circle punch out and then insert that into the 2 hole on your purse and attach the brad from the inside of your purse.
Next apply 2 glue dots to the bottom of your chocolate nugget and slide the chocolate inside your purse making sure the candy doesn’t slip out of purse holder 
 Then your finished here are the 2 I made last night I made one with cool Caribbean and one with the Loves me DS paper Hope you found these purses to be easy and fun to make . These would be a really cute small gift for co workers on valentines day OR even cute baby / wedding shower favors..
Thanks for peeking into day and see you tomorrow .
Until later .. Happy Stampin!


Dawn these are adorable…I’ve yet to make time to whip out any of these, and yet they really don’t take much time…go figure! Thanks for the inspiration.
What a great job you did on your tutorial. I must make a few of these to give out. They are darling and look so easy to do. Thanks for such great instructions. You are a peach!!!!
Love,Cheryl
How adorable! And what a great tutorial. I’ll have to make some of these. Thanks for showing us how.
~~Rita~~
Thanks for the visual instructions! I do much better seeing how it is done then trying to read the directions.
Those are absolutely adorable!!! What a cute tutorial. thanks for sharing!!!
OMGosh that is adorable! Thank you so much for the fabulous tutorial! I’m definitely going to try this today!
And the easy schmesy…I got that from my youngest son’s (8 y/o) friend who says easy schmesy lemon squeezy. How cute is that?
Thanks for the smile this morning Dawn!
WOW!! i didn’t realize they were so TINY!! how stinkin’ cute is that?!!!!
I will have to try this later. is there anywhere that will sell me just a few nuggets, so I don’t eat the rest of the whole bag myself!???!!!! 😉
Those nugget purses are darling! I see a big batch of those in my future;)
Thanks for the tutorial!
Have a great day!
Awesome job! Thank you, thank you very much, mon ami!
These are so cute!!!
I’ll have to make some up for my hostesses for the next month……GREAT JOB!!!
Hot damn – these are sweet! Guess what all my co-workers are getting for Valentines – well, the female co-workers anyways!! Thanks for the tutorial!
I have been looking all over for something really cute to give my little sunday school kids – how cute are these nugget purses??? I’ll have to make some boyish, but I think I can make it work. THANKS for the awesome tutorial!
Dawn, I have to tell ya, I think you are the cutest thing and so darn positive and so darn creative! I love coming here everyday. It is like being greeted with a huge Good Morning and a fresh breathe of air! Thank you for all that you do for us! I love these purses too! I wish I lived right next door! 🙂 Lisa
love the tiny purses.great job philly
Sooo cool! Thanks so much for the in structions. I don’t have the tag punch so I might have to wing it lol. I do have the tag corner punch. thanks again!
~~bobbie
I did it!! Thanks for the wonderful instructions, they are soooo cute. I am going to make them for give aways at my stamp camps. Dawn, you are great, I love ya. Janice 😉
These are too cute to make for my daughter’s class for school. She only has 4 boys — do you have a quick little thing that is more boyish to share???? The tutorial is GREAT!
How sweet…
Thanks for the step by step tutorial. It’s perfect.
These are really cute and I can’t wait to make some myself…
Rubber Hugs,
Renee
Those are so cool Dawn! Thanks for the tutorial!!!
Oh these are soo Cute!! thanks so much for the class!!! cheryl
Thanks so much for the step by step tutorial with pictures. You made it so easy for me to create thses cute little purses with various scraps I had just laying around. Very fun!
Your nugget purses are the cutest thing! Thanks for sharing your instructions. I’m going to try making some of these. 🙂
These are so darling! Thanks so for sharing them.
Maybe I’m blind, but I’m wondering if you could tell me the length of the ribbon handle.
Thanks again!
~Melanie
I *love* these – thank you for sharing. Absolutely awesome.
these little things are so wonderful…. what a great idea…. thank you for sharing…
Greetings from Germany’s borderline to Denmark
Finja
Super cute! I’ll have to give it a try.
Oh gosh, I love this idea too!! I just tried the snowburst technique & it worked perfectly, thank you for the tutorials!
I’m going to buy some candy now so I can try THIS neat idea too! You clever girl!
Sunshine NZ xo
Great tutorial Dawn! Nice project…so cute!
This are so cute. I just made one the see how long and hard they were. They are so easy and take no time. Thanks for sharing.
Great tutorial – thanks!
I would just like to say that out of all the different websites I went to, you helped me understand the directions better and thanks also for using measurements on paper.
I posted a link to your page for a template to the nugget purses on my blog. I hope that’s okay =)