
 Howdy girls I wish you all a WONDERFUL Thanksgiving tomorrow !! SO are you ready for the Star Burst tutorial ..
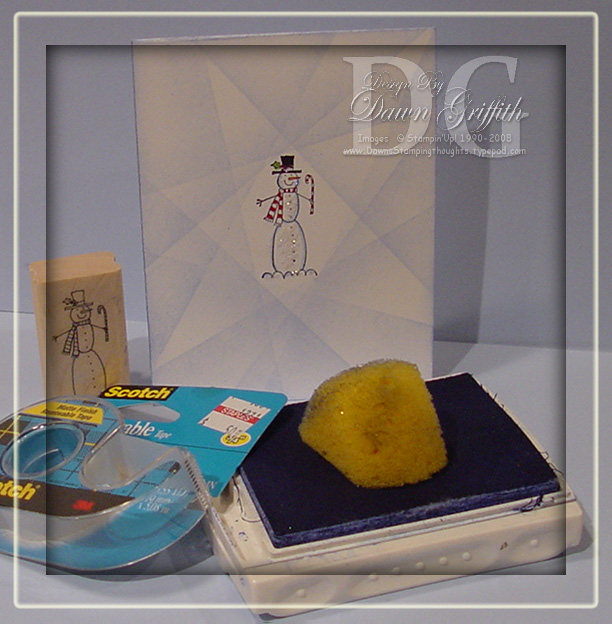
Here is what you will need
Removeable scotch tape , sponge , choice of ink and stamp image for center .. I have already stamped the image on to whisper white cardstock with Black classic ink and then tear off a piece of removable tape about 8 " or so you want it long enough to cover from corner to corner on your base card .. Remember you can click on any image to make larger .. Ok lets start..
 1st line your tape with the center image for the 1st burst line . Line tape as close to your stamped image as possible using the right sideof your tape as your guide to get as close to your image so you will not get ink on the center image BUT to create a focal point of the image you will then use your sponge( as shown in photo ) and apply ink using the right side as your guide the whole length of the tape. Apply ink lightly since you want a soft look to your star burst .

next lift off tape as shown in this photo .
 Ok the next step is to line up your tape once again using the center image as your base you will line up your tape line using the left side this time .. always making sure your tape line is as close as possible to your center image . apply ink once again just like in step 1 and then lift tape .. the great thing about this tape is that you can reuse this one piece many many times & it will not ruin your project when you lift it off
 the following steps are exactly the same as all the previous steps you will just be using the main focal image as your base line for your tape just remeber when lining up your tape line you will want to use the side of the tape line closest to your image and the other side for applying the ink Because since this tape is wide and you want your bursts as close as possible so your main image pops out at you ..

Seriously the more you playwith the position of your tape the more chances are that you will go crazy and keep adding star burst lines all over .. which is sooo awesome ..

Keep adding your tape lines for more Star bursts girls ..
 see the star forming right before your eyes .. YAHOO!! keep on playing .. then once your done color in your center image and TA DA you have a fabulous card that everyone will ask HOW DID YOU DO THAT??I of course I added a few extra star bursts on my finished card ( below ) Just play around you will love it .
 Hope you had fun with this tutorial please let me know by your sweet comments below Plus if you make one I would love to see it … Have a fabulous day girls .


Thank you so much for sharing, I was wondering how you did that, I love the card, I can’t wait til i’m off work to go home and try it! you are one talented lady! Happy Thanksgiving to you and yours 🙂
Fantastical! Wondermous! Thank you!
Such a clever idea 🙂
Oh yeah, now it’s all coming back to me when we did this with you in person. Awesome! Thanks for the refresher!
Wow! What an amazing effect! You ROCK, Dawn!
I love this! Thanks for a great tutorial!
Fan-damn-tastic Dawn! Wooo Hooo!
Mary
This is wonderful…
Janine
Dawn, that is so cool, thank you for sharing.
Kick butt tutorial,sweetie !!! This rocks !!!
Love ya bunches
Corinne
Very clever. I love it!
what a cool tutorial!!! thanks for sharing gf!!
Love this technique! Where do you buy removeable tape? I don’t think I have ever seen that before. All of your cards are wonderful and that peas on earth is hilarious!
Wow! I can’t ait to try this! What an awesome indea, than you so much!!
this is a great idea. I’m enjoying your tutorials very much. no matter what medium they are easy to understand. Tfs
Oh, Man! I love this! I’ve never seen removable tape before. I’ll have to make a trip to Staples the next time I go to Madison I guess. This looks sooo cool! Thank you for sharing your wonderful techniques with us!